As you know, sometimes the user profile in Windows can be corrupted which can make it difficult to log in or use some applications. These issues can be resolved by deleting the user profile from the registry and creating a new one, although some profile data may still be in the registry after deleting the user profile from the computer. So We explain here How to Delete a User Profile From Windows 10/11 using Registry.
A user profile is created when a new account is added in Windows 11 or Windows 10. This profile is made up of settings and folders that guarantee each user’s experience on the computer is distinct and personalized. All of their documents, saved games, videos, and other items are also included in this. This can consume some storage space, but thankfully Windows allows you to delete a user profile if you decide not to use it anymore or if it becomes corrupted.
In Windows 10 or Windows 11, deleting a user profile is a reliable way to restore an account to its factory settings without having to delete and add it again. If you want to completely clean out all the documents and downloads, or if you suspect there may be some settings off but are unsure exactly where it can be especially helpful.
Contents in this article
What is the difference between a user profile and a user account?
It’s important to remember that a user account and a user profile in Windows 10/11 are two distinct, but related, ideas. In Windows 10, a user profile is created when an account is added to a computer, but it isn’t always eliminated when the account is deleted. You can delete a user profile from Windows 10 or Windows 11 without also deleting the account.
In Windows, there are numerous ways to delete a user profile. But in this article, we’ll use the “Registry Editor” tool to delete the user profile. Review the following instructions in order to achieve that.
Why you may need to delete a user profile?
You might need to delete a user profile from Windows using the registry for a variety of reasons.
- When a Windows user account is deleted or no longer required, it may be a good idea to also delete the profile that goes along with it from the registry to make sure that any private data that was kept there is no longer accessible to other users.
- You may want to delete the chosen or unwanted profiles from the registry to declutter your system if your PC has multiple user accounts that are no longer required.
- In some circumstances, deleting user profiles from the registry may be required to fix issues with a user account or computer system.
Always keep in mind that deleting user profiles from the registry should be done cautiously because, if done incorrectly, it may result in unintended consequences. Before making any changes to the Windows registry, always create a backup of it. If you’re unsure how to proceed, you might want to consider consulting a professional.
Also Read: How to fix update error 0x800f0922 in Windows 10 and 11
How to Delete a User Profile From Windows 10/11
All of your files, pictures, documents, and registry entries connected to the user profile will be permanently deleted when you delete the user profile in Windows 10. When you log into the user account, Windows will nevertheless automatically create new user files, so the user account will still be accessible.
Note:- While logged into the User Profile you want to remove, you are unable to remove “User Profile”. So log in as a different user account to delete a user profile.
1. Remove a User Profile From Windows Registry
You must take the actions listed below in order to remove a user profile from the Windows registry.
- Press the Windows key + R to open the Run dialog box.
- Type
regeditin Run Dialog Box and hit Enter. - Now, navigate to the following path in Registry Editor.
HKEY_LOCAL_MACHINE\SOFTWARE\Microsoft\Windows NT\CurrentVersion\ProfileList- Find the user profile you want to delete by looking up its SID (Security Identifier) number. The profile can be recognized by its ProfileImagePath value, which displays the location of the user’s profile folder.
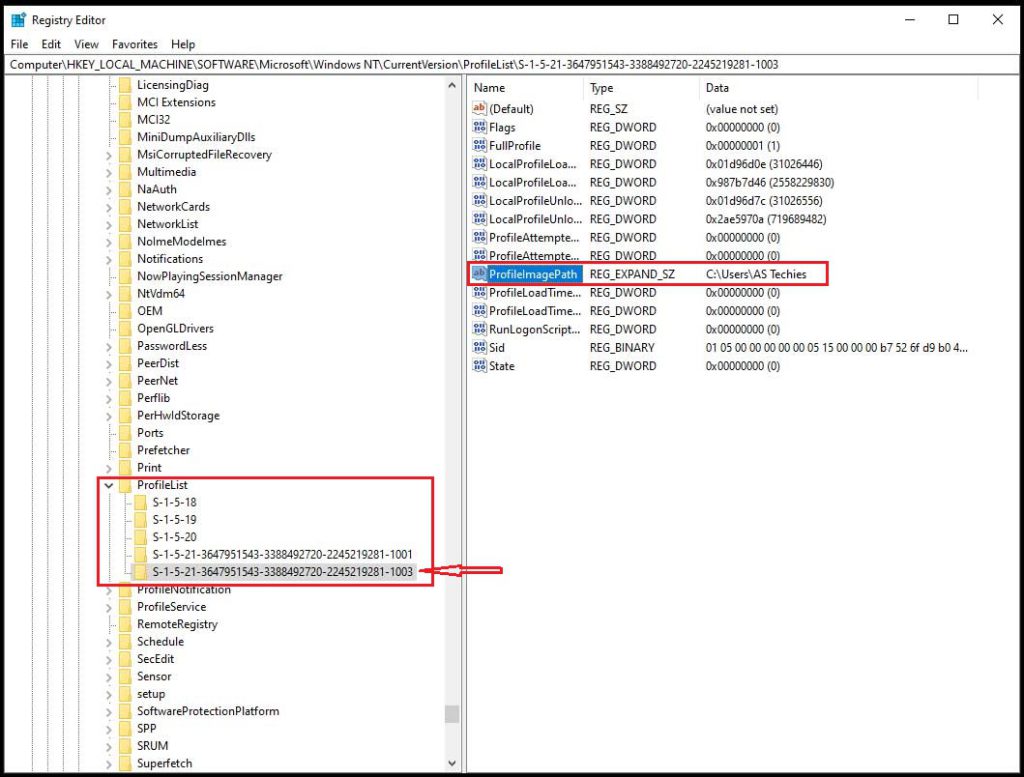
- In the left-hand side menu, right-click the correct user SID and press “Delete”
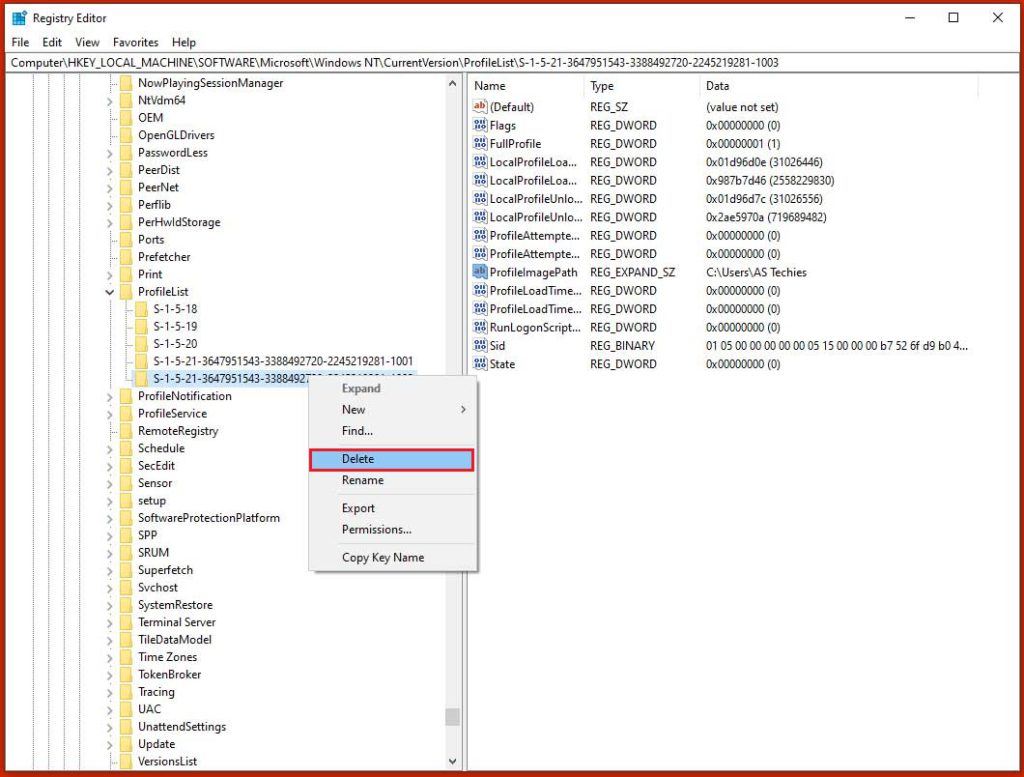
- Make sure you’re deleting the key for the correct user before clicking “Yes”.
- Now, your Profile has been successfully deleted from the Windows Registry.
- Close the Registry Editor and Restart your computer.
2. Remove a User Profile From Windows Explorer
In Windows, there are additional ways to delete a user’s profile, including manually deleting the user’s registry entries and the user profile folder, which are both located at the path “C:\Users\Username“.
The steps to delete the user profile folder are below. To delete the user profile folder, log in to your admin account or another user account with login privileges.
- Open File Explorer on your computer.
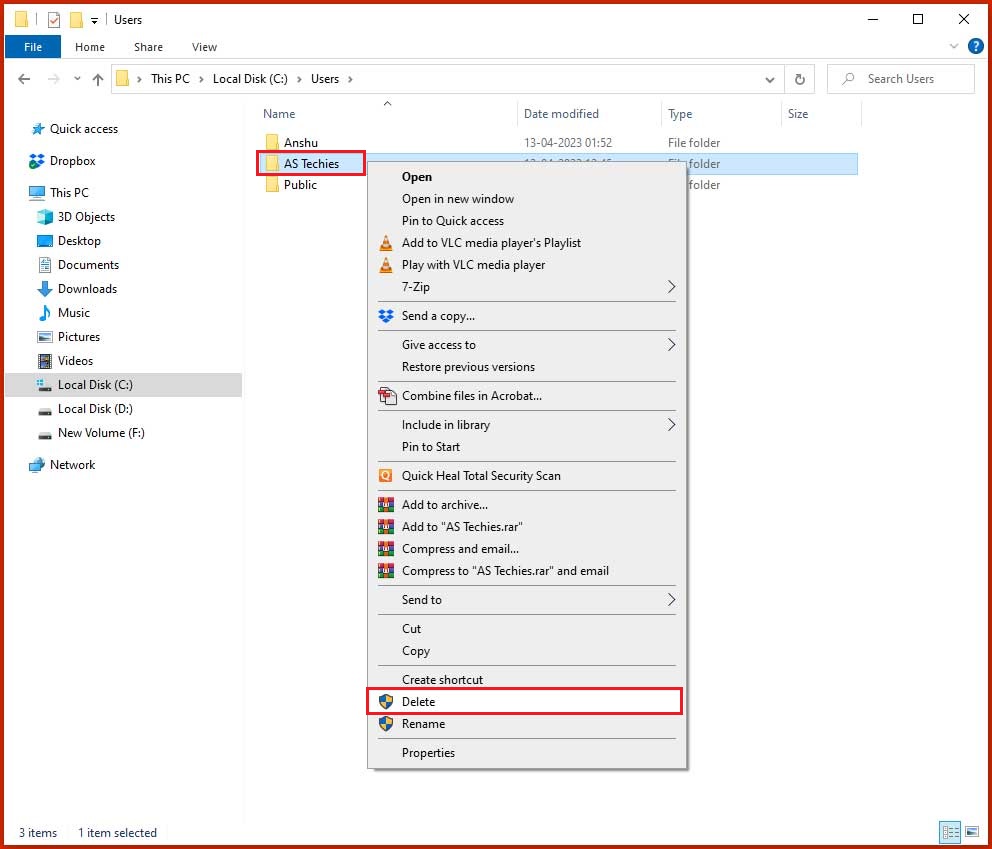
- On the File Explorer screen, navigate to This PC > Local Disk (C:) and open the Users Folder.
- In the Users Folder, right-click on the User Profile that you want to remove and click on the Delete option.
3. Remove the User Profile Using System Properties
By using this technique, the entire User Profile and all associated Registry Entries are deleted from your computer.
- Press Windows + R key to open Run Box.
- Type
SystemPropertiesAdvancedin Run Box and click Ok. - On the Advanced System Properties screen, click on the Settings button located under the “User Profiles” section.
- On the next screen, select the User Profile that you want to remove and click on the Delete button.
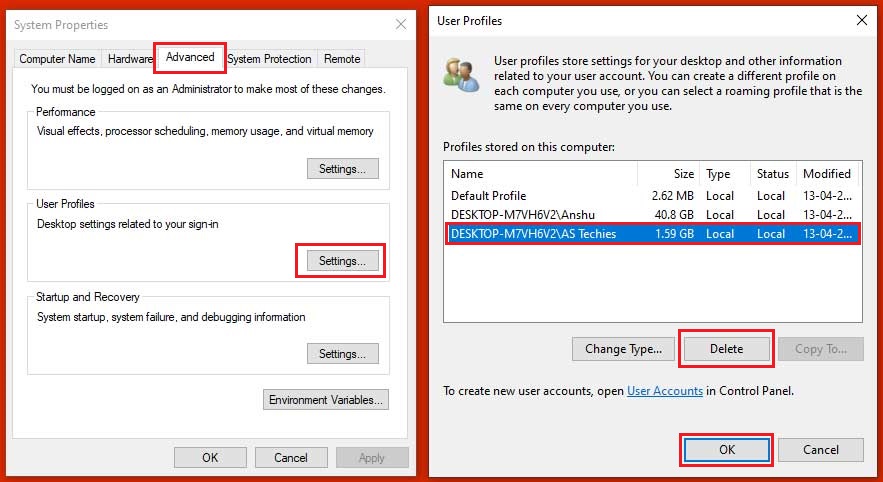
- On the confirmation pop-up, click on the Delete option to confirm.
Depending on how many files are linked to a user profile, it may take some time to delete it. Windows will automatically create user files after the user profile has been deleted when you log in using this user account. The File/Folder structure for the User Profile will be automatically created by Windows 10 when you log in to the User Account, as was already mentioned.



Discussion about this post