If you have a Windows computer or desktop computer, know that in the Windows family, you will find a very useful and optimal way to enable USB ports or disable USB ports on your laptop or desktop computer. However, many people do not know about its function or think that it can only operate or open a system USB port with the help of third-party software or antivirus.
We cannot compromise data security in any way. Disabling USB ports is a good solution to protect your device from viruses and other harmful elements. If you want to use USB devices from USB ports, you can enable these ports very simply using Registry Editor. You can easily manage system USB ports using Registry Editor. You can disable USB ports or enable USB ports using Registry Editor.
Every so often it will become integral to discover ways to disable USB ports to protect your data from dangerous viruses and people, as you can want to share your pc or computer with someone and that can be dangerous. The information documents within the system may be corrupted if any dangerous tool is inserted into it. To avoid such vulnerabilities, we’ve mentioned diverse techniques to enable/disable the USB ports for your system. These methods work on all Windows operating systems and only disconnect the USB drive without affecting the mouse, keyboard, and printer connected via USB.
Contents in this article
Why should I disable the USB port or drive?
Friends, as you know, there are many times when you need to share your laptop or PC with other people or friends. This person may also have a USB drive or external drive with a virus on it. This person can inject these malicious files into the system. , this will harm your system and data. Also, anyone can steal important documents via a flash drive or external drive.
Protect sensitive data from unauthorized users and Employees:
USB devices or other portable devices can lead to data theft or introduce malware when used carelessly on a network. Organizations often monitor the threat of USB drives where a single USB device can block the entire network.
Employees have a good understanding of company information and knowledge of the system. Without effective access control, data theft can be as simple as transferring it to a large storage device such as a USB flash drive. An unsuspecting employee can use this point by injecting a virus that introduces the virus into the system and even steals confidential information.
How to Enable or Disable USB Port in Windows 11/10/8/7
If the PC is used by several people, such as a shared computer, it may be safer if people can easily connect the USB at any time. Whether the owner of the USB drive knows it or not, their device may contain a malicious Virus, that may infect your pc. Now you can disable USB ports using this Article.
1. Disable/Enable a USB Drive Using the Registry
If you want to try to disable a USB drive using the registry, type “registry editor” in the search box (though maybe first take a look at our guide on creating a backup of your registry). When the registry editor appears open it or you can use the following instruction to open Registry Editor.
- Press Windows + R Key to open Run Box.
- Type the
regeditin the run box and hit Enter. - Navigate to the following directory in Registry Editor
Computer\HKEY_LOCAL_MACHINE\SYSTEM\CurrentControlSet\Services\USBSTOR- In the right pane, double-click “Start” to open the “Edit DWORD (32-bit)” box.
- The default value data will be set to “3.” To disable USB storage, change the “Value data” to “4” and click OK.
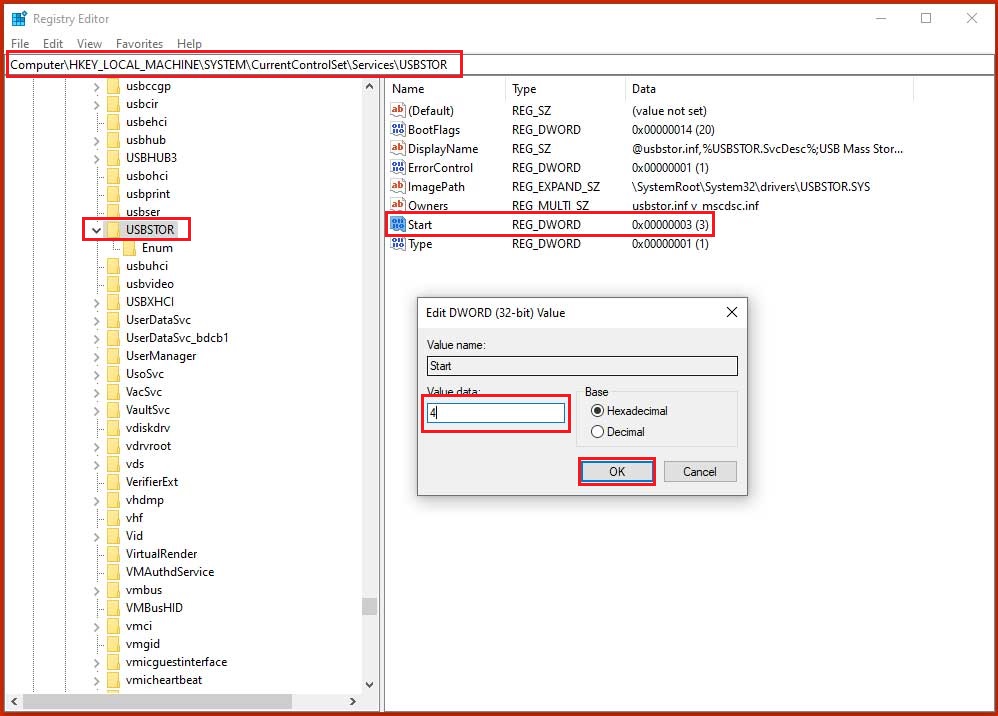
Now when you plug your USB drive into your computer it doesn’t show up anywhere and Device Manager shows an error while installing drivers for this device. To re-enable the USB ports later, change the value of the “start” parameter to 3 and click “OK”.
2. Block USB storage Using the Group Policy Editor
If you have important or sensitive data stored on your computer or laptop, disabling read/write access to removable storage devices can prevent users from copying certain information or protect your system from malware coming from external drives as well. Because it enhances the security of the system.
To disable the USB storage by using the Group Policy Editor, open “Run.”
- Press Windows + R Key to open Run Box.
- Type
gpedit.mscin the run box and click Ok. - Once Group Policy Editor opens, navigate the following path.
Computer Configuration > Administrative Templates > System > Removable Storage Access.- When you click on “Removable Storage Access,” you will see multiple settings in the right pane. Look for the options that say “Removable Disks: Deny execute access,” “Removable Disks: Deny read access,” and “Removable Disks: Deny write access.”
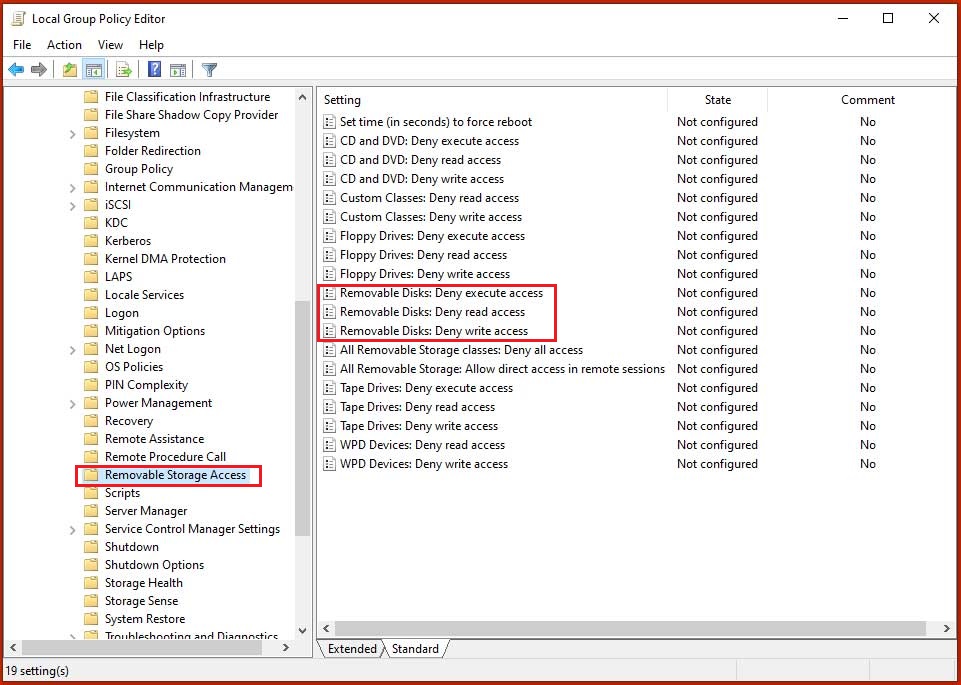
- Click each to configure. Clicking on one of them will bring up a new page with the selected name. On the left, there are three options: Not Configured, Enabled, and Disabled.
- Click “Enabled” to disable it. If you change your mind and want to turn it back on, select the “Not Installed” or “Disabled” option.
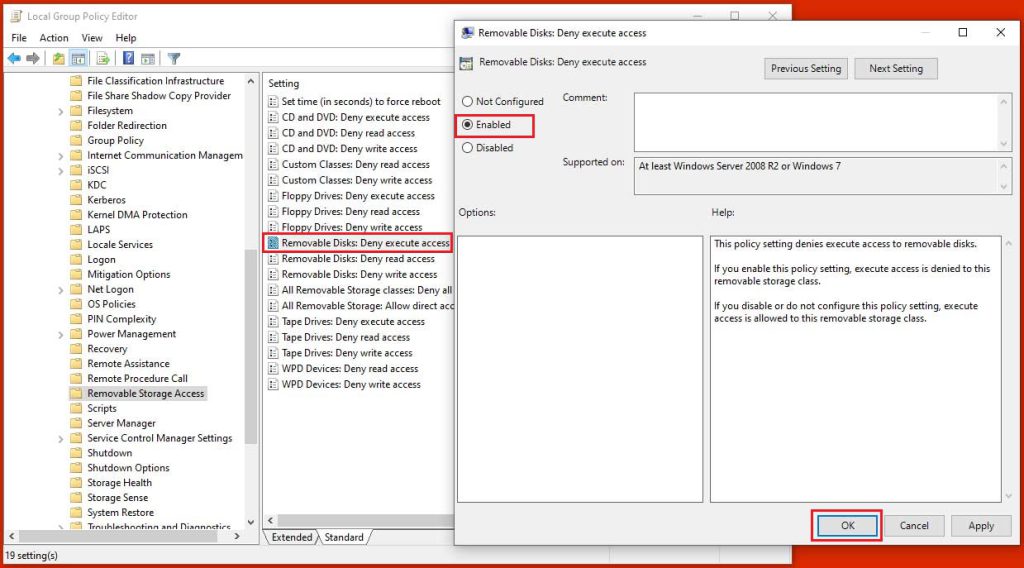
Now, open the Run box and run the gpupdate command to update your Group Policy or restart your computer.
3. Enable or Disable USB Ports Using Device Manager
You can protect your system from malicious users such as schools, offices, etc. by preventing USB storage drivers. Just uninstall this driver and disable it. When someone tries to plug in a USB, Windows prompts them to install the USB driver but is not able to install the driver. You can reinstall the driver after resolving the issue (USB device detected) again.
- Press Windows + R Key to open the Run box.
- Type the
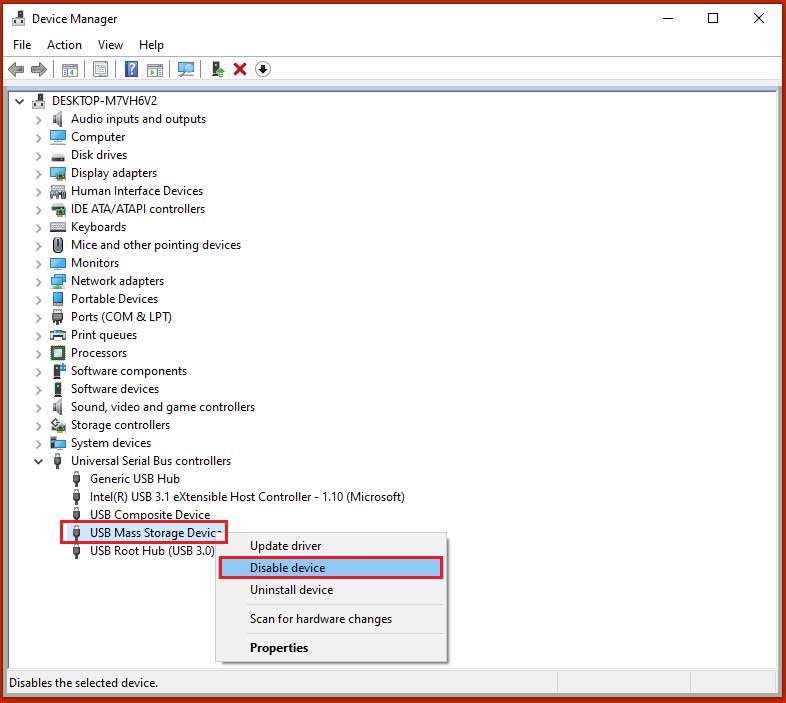
devmgmt.msccommand and hit Enter. - Once the Device Manager opens, look for your Universal Serial Bus Controllers and select the USB Mass Storage Device.
- Right-click on USB Mass Storage Device and Select Disable device.
- Now, click yes to disable USB Mass Storage Device.









Discussion about this post